
Kerm Martian's TI-BASIC Tutorial :: Contents
Introduction to the TI-83/+/Silver BASIC Tutorials
Welcome to this cumulative tutorial covering nearly the entire TI-BASIC programming language for the TI-83, TI-83+, and TI-83 Silver Edition. It covers everything from creating programs to advanced graphics features. The only requirements are a TI-83, TI-83+, or TI-83 Silver Edition. By the end of these tutorials, you should be able to create programs, games, and math utilities easily and quickly. Without further ado, here it is!
Syntax and Conventions
| Text | Normal instructions |
| Link | An external or internal link |
| [TEXT] | Button on the calculator keyboard |
| /n=/,/<=/,/>=/ | Not equal to, Less than or equal to, greater than or equal to |
| var | Don't enter this as it is; replace it with something else, in this case a variable such as A, Str0, or Xmin |
Creating Programs
The menu you will be using most in these tutorials is the Prgm menu, found by pressing the [PRGM] key from practically any menu or the homescreen. At the top will be three options:
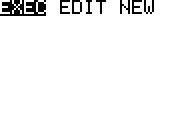
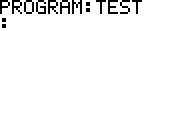
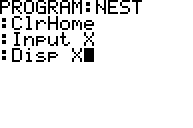
Press [>][>] to highlight the NEW menu and press [ENTER]. You will be prompted for a name for your program. It can be between one and eight alphanumeric characters long; the fist character must be a letter. When you are done, press [ENTER]. You will be at the following screen, where you will later learn to program:
Press [2nd][MODE] to quit back to the homescreen.
Running Programs
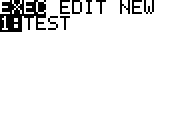
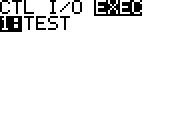
To run programs, you will need to go to the program menu. The EXEC option and the program you have just made will be highlighted. Press [ENTER] to paste the name to the homescreen, and press [ENTER] again to run it:
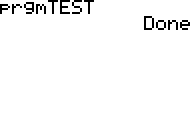
For now, it should just display "Done". In the next section you will learn to add content and make your program actually do things.
Editing Programs
To edit programs, go to the program menu, press [>] to highlight the EDIT option at the top and then press [ENTER] to edit the highlighted program.

You will be brought back to the screen you were at when you first created the program. You can access most of the commands to edit programs by pressing PRGM from inside the program editor. You will get the following menus:

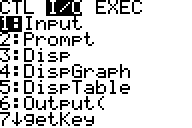
In the following tutorials you will learn more about these commands and how to use them.
Displaying Text Onscreen
You can display text onscreen from inside a program using the Disp command. This will display text on the next line onscreen. A sample use of the Disp command might go something like this:
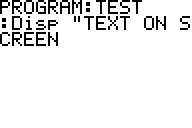
You can have up to 16 characters after the quotes. A quote at the end of the line is unnecessary and will only increase the size of a program. Remember to press [ENTER] at the end of each command to get a new line ( : ). Quit and then run the program as learned before. Congratulations! You have made your first real program!
Displaying Text at a Specific Location
You can display text at a specific location onscreen from inside a program using the Output( command. This will display text on the next line onscreen. A sample use of the Output command might go something like this:
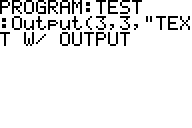
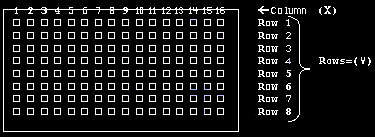
The first two numbers indicate the (Y,X) location of the text onscreen. The screen of the TI-83/+/SE has eight rows and 16 columns, so the maximum values are (8,16).
You can have up to 16 characters after the quotes. A quote at the end of the line is unnecessary and will only increase the size of a program. Remember to press [ENTER] at the end of each command to get a new line ( : ). Quit and then run the program.
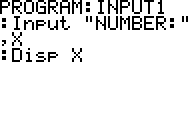
Inputting Numbers
You can easily get numbers inputted by the user. The form is simple and uses a single command Input, found by going to [PRGM][>][1]; it has the following syntax:
Input var
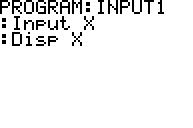
where var is the name of the variable that you are getting. Acceptable variables are A through Z and theta. For example, the following program will get a number and then display it on the screen.
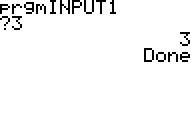
When you run this program and enter "3", you will get:
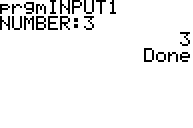
There is also a more complicated way to use Input that allows you to output text before inputting a variable. The syntax is:
Input "TEXT",var
where var is the name of the variable that you are getting and TEXT is any text up to 16 characters. A sample program using this might be coded thus:
When you run this program and enter "3", you will get:
Prompting for Numbers
You can also prompt for numbers to save space. For example, instead of using the command:
:Input "X",X
you can use save 4 bytes and use the command:
:Prompt X
when the program containing this is run, it will output the following text and wait for a number:

The use of either command depends upon what you want to do. If you simply want to let the user know which variable they are inputting, it is more efficient to use the Prompt command. If you want a more complex text string, use the Input command.
Clearing the Screen
It is often useful to clear the screen before running a program, in the program, or after the program finishes running. This uses a simple command:
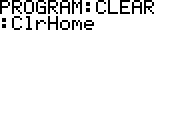
Wherever you put this command, the screen will be cleared.
Review Part 1
So now you have gone through the first eight sections of my TI-BASIC tutorial. Here is a review of everything you have learned so far:
Creating Programs
Running Programs
Editing Programs
Displaying Text Onscreen
Displaying Text at a Specific Location
Inputting Numbers
Prompting for Numbers
Clearing the Screen
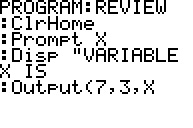
Here is an assignment for you: Create a program on your calculator named REVIEW that:
1. Clears the screen
2. Gets a value for X
3. Says "VARIABLE X IS"
4. Displays the value of X at column 3, row 7
The answer is below, No cheating!
If Statements
Since it is designed originally for math, your calculator can check the truth of many types of conditionals and do different things based upon whether it is true or false. The base of this is the If statement, for which there are three different syntaxes. The first and simplest checks for a value and acts accordingly:
:If condition
:Single command
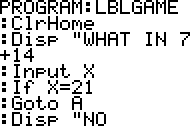
If the conditional is true, the single command following will be executed. For example, this program is a very simple game based upon the first usage of If. Type it and run it on your calculator:
However, you can only have a single command after the If statement. If you want to execute multiple commands, use this syntax:
:If condition
:Then
:Command
:Command
:End
You can insert as many commands as you need between the Then and End; the End signifies the completion of the commands dependent upon the If statement. The final usage of If checks the value of a conditional, does one thing if it is true, and does another if it is false. Thus: :If condition
:Then
:Command
:Else
:Command
:End
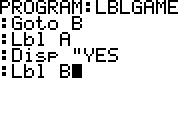
Once again, you can have multiple commands between the Then and the Else, and between the Else and the End. If the condition specified after If is true, the command(s) between Then and Else are executed; if it is false, the command(s) between Else and End are executed. Here's a more complex version of the game above using the syntax you have just learned:
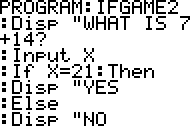
Try it out! Just a couple of notes in case you were confused:
· If, Then, Else, and End can be found at [PRGM][1], [PRGM][2], [PRGM][3], and [PRGM][7], respectively.
· =,/n=/,>,<,,=<, and >= can be found under [2nd][MATH]
The Pause Command
Here's a simple command to give you a break from the rigor of If statements. If you want the program to stop at a certain point, wait for the user to press the [ENTER] key, and then continue, use this command:
:Pause
That's it! If you want to save space and are using
:Disp "TEXT
:Pause
you can use this instead:
:Pause "TEXT
Boolean Logic
Now you have learned to use If statements in you programs to direct the execution. But what if you want the program to act depending on two or more conditions? For this you will need to use Boolean logic, specifically the and or or operators. Here are the truth tables for both of these functions with two conditions, where 0 is false and 1 is true:
| AND | ||
| A | B | Out |
| 0 | 0 | 0 |
| 0 | 1 | 0 |
| 1 | 0 | 0 |
| 1 | 1 | 1 |
| OR | ||
| A | B | Out |
| 0 | 0 | 0 |
| 0 | 1 | 1 |
| 1 | 0 | 1 |
| 1 | 1 | 1 |
You can see that with and, every input has to be true for the output to be true, while with or, any true input makes the output true. Found under [2nd][MATH][>][1] and [2nd][MATH][>][2] respectively, and and or have the following syntax:
:If condition and condition
:(Then)
:Command(s)
:(End)
:If condition or condition
:(Then)
:Command(s)
:(End)
Note that both of these can be used with any of the three syntaxes for If discussed in section 10. Also, you can have as many conditions after an and or or as you like.
While Routines
The While command, as its name implies, will continue to perform a loop until a specified condition is true. Here is the syntax:
:While condition
:Command
:Command
:End
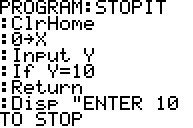
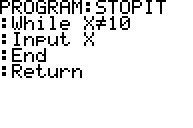
While the condition is false, the commands will continue to be carried out; when the program gets to the End, it will go to the first command after the While and repeat the loop. When the condition becomes true, it will continue execution right after the End. Once again, you can use any syntax associated with If. Here is an example that uses the lessons learned in the previous two sections:
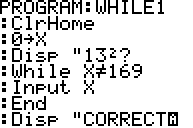
This program will continue to prompt the user for an answer until the user enters the correct number, in this case 169. Type it into your calculator and try it!
"For" Loops
One of the most useful commands in the programming repertoire of the TI-83/+/silver is the For loop. This lets the calculator repeat a loop a specified number of times. The syntax is as follows:
:For(variable,start,end,increment
:Command(s)
:End
The program will set variable at the value of start, run Commands, add increment to variable, and continue to do this until variable equals end. Variable stands for one of the built in variables, A to Z and Theta; start, end, and increment are numbers. For example, the following program uses a For loop to display a number 10 times. Note that when the value of increment is 1, it and the comma preceding it can be omitted.

This command can be used to get an input from a user a specified number of times, repeat and operation several times, or even as a delay. I'll leave you with the code for a program to delay for one second (two-fifths of a second of the TI-83 SE):
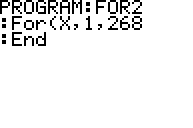
Keep practicing what you have learned!
Labels and Gotos
So far I have taught you all about loops and other methods of repetition; I have saved this method until now because of a limitation. Although it is very handy, it should be used sparingly to avoid clogging up your programs with useless commands. Because of the thousands of possible combinations, it is tempting to use these profusely in your programs. When possible, avoid the temptation and use While and For instead. Strictly speaking, a label is a location in your program defined by a one or two character alphanumeric label, so:
:Lbl xx
In order to have program execution jump to a label, you need to use the following command:
:Goto xx
where xx is the identical alphanumeric sequence of the label, a one or two character identifier. This can be easily incorporated into If statements to control a loop. For example:

This will continue to add 1 to X until it equals 255. Another use for labels is in menus, which will be explained in the next section. Here's a game from volume three that used If...Then statements; here it uses labels:
Menus
Another useful command is the Menu command, which functions in some ways like the Goto command. It will display a predefined menu with up to 7 options onscreen. Here is the syntax for Menu:
:Menu("TITLE","OPTION 1",XX,"OPTION 2",YY,"OPTION 3",ZZ
Don't type the line breaks as seen above; I'm just showing how the calculator will wrap the text so that it fits on the screen. In the syntax example, XX, YY, and ZZ are the alphanumeric identifiers of labels. If you were to type this into your calculator as part of a program, you would have to have a Lbl XX, a Lbl YY, and a Lbl ZZ. You must have a "TITLE" string; otherwise the program will return an Err:Syntax. Also, if you have more than seven options, you will also get an Err:Syntax. Use this often, as it is more economical as far as memory than using text and Gotos. The sample menu above would be displayed onscreen this way:
TITLE
1.OPTION1
2.OPTION2
3.OPTION3
Return and Stop
This section will explain the use of the Return and Stop commands. Each terminates execution of the program, but they do it differently. Return stops only the current program and allows any program that called your program to continue running (explained in a subsequent section). Stop forces the termination of execution of all pending programs and returns you to the homescreen regardless of the program that called it (unless it was an assembly program or a shell like MirageOS; more on that later). However, there are instances, such as every program that I have used as examples so far, that do not require the Return or Stop command. If the calculator is executing and reaches the end of a program, it will automatically stop executing as if it had encountered a Return command. This is useful and saves two bytes whenever used. Here's an example of each in action:
Noticed that the final Return could be omitted and the program would work just as well.
Programs Within Programs
Sometimes a program you are writing needs to perform a repetitive task, for example dividing six numbers by another 10 numbers several times within the program. Instead of typing out the routines each time they are used, you can use nested programs, or programs within programs. To run another program, place the cursor where you want the program to run, press [PRGM][>][>], use the up and down arrows to select the program you want to run, and press [ENTER]. This will paste prgmNAME into your program. Here is an example that you can try. Say I have this program:
and I want it to be called from another program. Here's how the "parent" program would be coded:
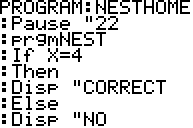
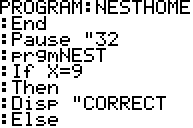
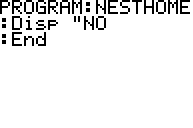
(that's the longest program you've learned here so far!). If you type this into your calculator and run it, the program NESTHOME runs NEST twice, thus saving quite a bit of complication and confusion. In this instance it does not save that much space, but other more repetitive programs benefit greatly.
This is also useful if you have a particularly long program that, if a certain segment were omitted, would have less clutter between a Goto and its associated Lbl. Taking out the segment and making it a standalone program will speed up everything. However, be careful about Lbls: the program can only jump within itself, and cannot jump to a label in another nested program.
The general accepted form is to name nested programs Zparentn, where parent is the name of the parent program and n is the number (if you have more than one nested program). You can also use θparentn (that θ is theta, on [ALPHA][3].
Random Numbers
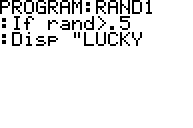
Another extremely useful feature of the TI-83/+/SE is the random number generator. It is built into the calculator's programming and can be called from several functions; the most useful for programmers and the ones that I will cover here are rand and randInt. You can access them from [MATH][<][1] and [MATH][<][5], respectively. Rand can simply be used as a number or variable might in your program, and does not require an argument (value or values in parentheses after the command). It returns a random decimal number of about ten decimal places between 0 and 1. For example, this program does either of two things based on a 50-50 chance created by rand:
The randInt command, while somewhat more complicated, is quite a bit more useful. The syntax is:
:randInt(start,end
It will pick a random integer (non-decimal positive, negative, or zero number) between start and end, inclusive. Here's a screensaver-type program that incorporates much of what you have learned so far:
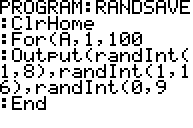
This displays a random digit 0-9 at a random location on the screen 100 times. You can also use rand and randInt this way:
:rand->variable
:randInt(start,end)->variable
Review Part 2
That's right! It's time for another review lesson. The previous ten lessons of this TI-BASIC tutorial have covered:
Logic Statements
Pause the Execution
Boolean Logic
While Routines
"For" Loops
Labels and Gotos
Menus
Return and Stop
Programs within Programs
Random Numbers
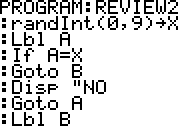
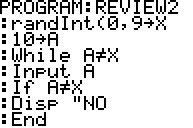
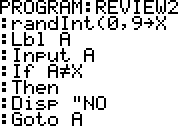
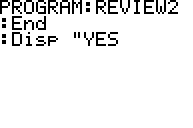
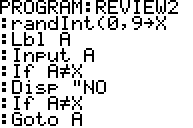
And with that in mind, here is your second review assignment. Create a program named REVIEW2 that will:
1. Set the variable X with a random integer 0 to 9.
2. Get a value for A from the user.
3. Put "NO" onscreen and go back to step 2 if A does not equal X.
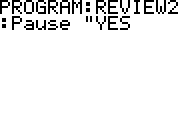
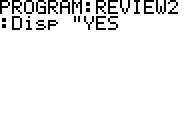
4. Put "YES" onscreen, pause, and quit if A equals X.
There are several possibilities; the answers are are further down (no cheating!).
  |
  |
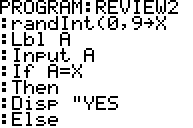 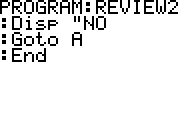 |
That last one is not a good idea because a Goto inside an If...Then...Else...End causes memory "leaks" and slows down your programs. This also applies to the leftmost program below:
  |
  |
That last one is the best and smallest way to do this assignment. If you used different label names or something, don't worry about it; it's not important. Study these possibilities and compare them to yours. Try to figure out similarities and differences and see how you are progressing. If you have any unresolved difficulties, feel free to email me at Kerm_Martian@yahoo.com so I can improve these tutorials.
Copying and Pasting
I was looking over the six volumes of this tutorial so far and noticed that I have not yet mentioned a valuable feature of the TI-83/+/SE. It is not a programming command, but is immensely useful for renaming programs, etc.
I'll start with renaming a program. This would normally be impossible were it not for the Rcl command. Found at [2nd][STO>], this lets you recall content from one program into another. The best way to explain this is a step-by-step list. You have a program named EG, and you want to rename it to EXAMPLE. Here's how:
1. Quit to the homescreen.
2. Press [PRGM][>][>][ENTER] to create a new program.
3. Type EXAMPLE and press [ENTER] to name the program.
4. Press [2nd][STO>] to activate the Recall command.
5. Press [PRGM][>][>] to reach the Program Exec menu.
6. Use the up and down arrows to find prgmEG.
7. Press [ENTER] to paste the name, and [ENTER] again to recall the program.
8. When the recall is complete, press [2nd][MODE] to quit.
9. Press [2nd][+][2][7], arrow down to prgmEG and press [ENTER] (on the TI-83) or [DEL][2] (on the TI-83+ and TI-83SE) to delete prgmEG
That should make a fair amount of sense to you. It is important to remember that you must create the program, paste the data, and then delete the old program. Secondly, I will teach you how to paste single sections of code from one program to another.
1. Follow steps 1-7 above
2. Go to the beginning of the pasted section and repeatedly press [CLEAR][DEL] until you reach the section you want
3. Go to the end of the section and repeatedly press [CLEAR][DEL] until you reach the program itself again
However, be careful not to get carried away with [CLEAR][DEL]. Going slowly and spending an extra minute is worth it when the alternative is having to recode a section of your program.
Strings
So far you have learned to use variables, manipulate them, and display them onscreen. But what if you want to deal with text? In this section you will learn to use strings, the 10 built-in variables capable of holding text.
The strings can be found in [VARS][7][0] through [VARS][7][9], corresponding to Str0 to Str9. These can each hold an unlimited number of characters, limited only by the amount of free RAM on your calculator. They can be used as variables are, such as in these methods:
:Disp Strn
:Output(y,x,Strn
:Input Strn
:Prompt Strn
where n is the number of the string and x and y are the coordinates used in the Output( command.
However, the syntax for saving data to a string differs somewhat from that used for numbers. Whereas with a numerical variable you would enter:
:12345->X
with a string you must enclose the text in quotes:
:"TEXT"->Str2
Other than this difference, you can use strings much as you would use numerical variables. One plus is that you can use practically any character in a string, not just upper case letters. You can also use numbers, the pseudo-lowercase letters found under [VARS][5], [VARS][5][>][>], and [VARS][5][<][<], and all of the programming and graphing commands (e.g. - Disp, Log(, etc). Note that the two characters you cannot use are the -> character found at [STO>] and the " (quotes) character. You can substitute --> ([-][-][2nd][MATH][3]) and '' ([2nd][ANGLE][2] [2nd][ANGLE][2]), respectively.
The GraphScreen
The graphscreen is the area of the TI-83/+/SE where programmers create all of the awesome graphics used in games and other programs. You can normally access it from the TI-OS by pressing [GRAPH]. On this 64 by 96 pixel area equations entered under [Y=] are graphed and the drawing tools in [2nd][PRGM] are placed.
You may have been frustrated using other people's programs when you run them and all of the graphics are marred by the axes in the middle of the screen. You can easily fix this in you programs by using the following convention:
PROGRAM:NOAXES
:AxesOff
:program
:AxesOn
AxesOn and AxesOff can be found in the [2nd][ZOOM] menu of the TI-83/+/SE. While editing your program, press [2nd][ZOOM][v][v][v] for AxesOn and [2nd][ZOOM][v][v][v][>] for AxesOff.
Text on the Graphscreen
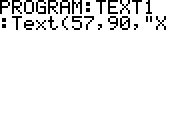
At the end of the last tutorial you learned a bit about the graphscreen of the TI-83/+/SE. One of the useful things you can use this for is displaying text. It uses a command similar to the Output( command, through the command, Text(, differs somewhat. Here is the syntax:
:Text(y,x,"TEXT
:Text(y,x,variable
:Text(y,x,Strn
All of these are valid uses. You can find the Text( command under [2nd][PRGM][?][ENTER]. However, the x and y values are based on a different scale than for the Output( command. Since the graphscreen is 64 pixels high and 96 pixels wide, and the first row is x=0 or y=0, not 1, the maximum values for (x,y) are (90,57). If this doesn't make sense to you, just trust me on it. So this command will put the letter X at the bottom right corner of the screen:
Don't forget that the y-coordinate comes first and the x-coordinate comes second. Here is a diagram of the graphscreen to help you understand the coordinates (all coordinates are in (y,x) form.
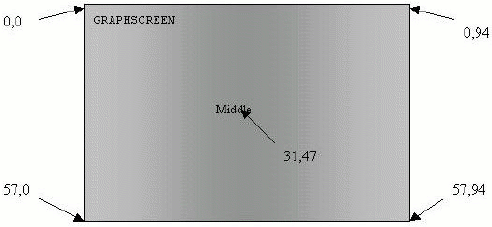
Hopefully this clears up any confusion. As long as you understand that it is (y,x), not (x,y), you should do well with this command.
The font used on the graphscreen is a variable width font; that is, each letter is a different number of pixels wide. All uppercase letters and numbers are 4 pixels wide; spaces are 2 pixels wide, and lowercase letters vary from four to six pixels wide.
Lines
You may be familiar with the Line( tool from the drawing menu. If not, it is a command that lets you specify the (x,y) coordinates of the endpoints of a line and it will draw the resultant line on the graphscreen. The syntax for the Line( command is as follows:
:Line(X1,Y1,X2,Y2
Note that the X and Y coordinates must be within the window range; otherwise it will not show up. You can find it under [2nd][PRGM][2]. An advanced syntax for the line command is as follows:
:Line(X1,Y1,X2,Y2,0
This will erase a line with these coordinates, whereas the first syntax draws a line over whatever else is on the graphscreen. The best way to understand this command is to try this in your programs. For example, type this and run it:

This produce this on the screen:

If it doesn't, you need to use this program:
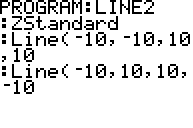
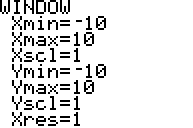
You can find the ZStandard command under [ZOOM][7]. What this does is make:
Graphing from Programs
I'll bet that by now you are wondering, since you can put lines, text, and other things on the graphscreen from within a program, if you can actually graph from within a program. The answer is an emphatic yes. Before I show you how to do that, however, I need to teach you how to clear the graphscreen, which I realized I have not yet done. This uses a single command without an argument, found under [2nd][PRGM][ENTER] or [2nd][PRGM][1]:
:ClrDraw
That's it! This will clear the screen of text, lines, and drawing tools; however, it will leave the axes in place if they are enabled and will leave any graphing onscreen.
On to teaching you how to graph. As you know, there are ten main graphing variables, Y0 through Y9. You can manipulate these from within your program, thus allowing the program to graph. The syntax for saving an equation to a graphing function is this:
:"equation" Yx
Make sure that you put the equation in quotes; otherwise a syntax error will be returned. You can find Y0 through Y9 under [VARS][>][ENTER][0] through [VARS][>][ENTER][9]. However, simply putting an equation in a function is not enough to graph onscreen. You also need to go to the graphscreen and display it, thus:
:DispGraph
This can be found at [PRGM][>][4] from within the program editor. So now that you understand graphing (hopefully), here is a sample program:

If you are especially confused by any of the commands used above, review the last two tutorials for clarification.
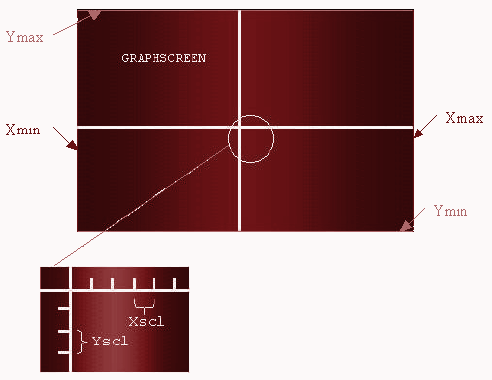
The final part of graphing that I will explain in this tutorial is adjusting the graphscreen parameters: Xmin, Xmax, Ymin, Ymax, Xscl, Yscl. These are all found from [VARS][1], and can be used as variables normally are used. First, an explanation of what each one does:
You can place values in the graph variables thus:

You can also get, move, and display these values as you are accustomed to do with any other variables in these and other ways:
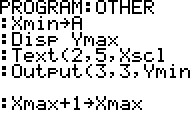
That's about it!
DispTable
This short section will teach you how to display the table associated with the graph from your program. It uses the DispTable command, found under [PRGM][>][5] from inside the program editor. The syntax is as follows:
:DispTable
When the program comes to this command, it will display the table and pause execution; when the user presses [ENTER] it will continue execution directly after the DispTable command.
Circles, Horizontals, and Verticals
By now I'm sure that you have made many cool pictures. If so, then you might hav erun into the problem of drawing circles. You might know how to do this from the draw menu, but are mystified about drawing circles from within programs. Wonder no more! Using the Circle( command from [2nd][PRGM][v][v], you can draw circles. Here is the correct syntax:
:Circle(x,y,radius
where x and y are the coordinates of the center of the circle, and radius is the radius of the circle. However, be aware that if you have used ZStandard, the circles will come out as an oval. To fix this, you can use ZSquare from [ZOOM][5]. Here is a sample program that will draw a (sort of) crosshair in the middle of the screen:
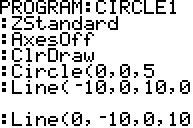
Pretty nifty, eh? But wait! There is an even more efficient way to make this program work. You can use the Horizontal and Vertical commands, found under [2nd][DRAW][3] and [2nd][DRAW][4]. Here is the syntax for each:
:Horizontal y
:Vertical x
Horizontal will draw a line across the entire screen where y=yx. So here is the program from above modified and made a bit smaller:
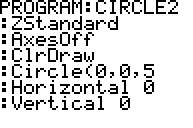
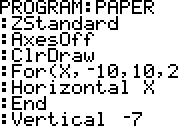
So as you see, this does the exact same thing, only a bit smaller. Now you can create even better programs! I'll end this lesson with a program to create a piece of "lined paper" that uses several things you've learned:
Saving and Opening Pictures
Thanks to yet another ingenious feature, the TI-83/+/SE can save and open up to ten predefined pictures. You can save your own pictures to each of these, do other stuff, and then open them again. To save pictures, use the StorePic command, from [2nd][DRAW][<][1]. Here is the syntax:
:StorePic x
where x is a number between 0 and 9. This will save the 96*64 pixels on the graphscreen (768 bytes) to the picture with number x. When you want to open the picture again, you use the RecallPic command, with this syntax:
:RecallPic x
where x is the same number as the picture that you saved. There is, however, one unfortunate limitation to these commands. This syntax is not allowed:
:StorePic var
:RecallPic var
You must instead use this:
:If var=0
:StorePic 0
:If var=1
:StorePic 1
etc. to var=9. These commands are useful for drawing programs, slide shows, and more.
Review of Lessons 21-29
It's time for the third review! Here's what you have learned in the last nine tutorials:
Copying and Pasting
Strings
The Graphscreen
Text on the Graphscreen
Lines
Graphing from Programs
DispTable
Circles, Horizontal, and Vertical
Saving and Opening Pictures
Whew...that's a pretty exhaustive list! Here is your review assignment.
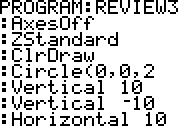
Create a program named REVIEW3 that will do the following:
1. Turn off the axes
2. Zoom standard
3. Clear the graphscreen
4. Draw a circle with center (0,0) and radius 2
5. Draw a line from the top to the bottom of the screen where x=10 and another where x=-10
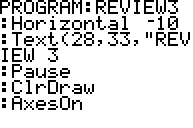
6. Draw a line from the left side to the right side of the screen where y=10 and another where y=-10
7. At x=33 and y=28, display the text "REVIEW 3"
8. Pause
9. Clear the graphscreen
10. Turn the axes back on
When it gets to the Pause, it should look like this:

As usual, the answer is on the next page.
GetCalc
You are now getting towards a complete mastery of TI-83/+/SE BASIC. Having completed thirty sections of this tutorial, it is time for a new area of learning: calculator-to-calculator communications. You probably know how to send and receive programs between calculators from the TI-OS. You might even have heard of games that can be played between two calculators across a link cable. Now you will be able to make programs like this for yourself!
At the bottom of the [PRGM][>] menu are three linking commands:
0:GetCalc(
A:Get(
B:Send(
Although all of these are used in linking, two are used only for communication with a CBL/CBR device. The only command used in calculator-to-calculator communications is the GetCalc( command. Here is the syntax:
:GetCalc(var
Where var can be any one of the following:
· A real variable (A-Z and theta)
· A string
· A graph variable
· A picture
· A list
· A Graph Database (GDB)
You simply insert this anywhere in your program, and it will get the variable a connected calculator. There is now requirement for what the other calculator is doing; the only limitation is that it cannot be running an assembly program. This can be useful in many ways. For example, you could make a Sim City program that saved the cities as lists (more on that later) and could trade cities between calculators.
Repeat
The Repeat command is very similar to the While command, but performs slightly differently. The syntax is:
:Repeat condition
:commands
:End
However, While does the loop between While and End until the condition specified becomes false; Repeat does the loop until the condition becomes true, at which point it continues directly after the End. Here's a comparison of two programs that do the same thing to give you an idea of the similarities and differences:
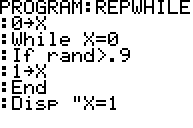
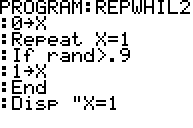
So you can tell the basic differences, right? Good; go use it in your programs!
Pixel Drawing
All right, back to some graphics programming commands. You can turn individual pixels on the graphscreen on and off for more control over drawings. The pixels have the same format as text, using coordinates in the (y,x) form. There are four possible commands:
:Pxl-On(y,x
:Pxl-Off(y,x
:Pxl-Change(y,x
:Pxl-Test(y,x)->var
The first three commands are fairly straightforward; they turn the selected pixel on, off, or change respectively. The fourth command, Pxl-Test, is somewhat more complicated. It checks whether the selected pixel is on or off and return a value to the variable. If the pixel is off, it returns a 1; if it is on, it returns a 0. Here's a more graphical explaination:
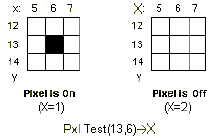
So now this should make sense.
Drawing With Points
At the end of the last section, you learned about drawing, erasing, and testing pixels on the graphscreen. What if you want to turn a pixel on or off at an (x,y) coordinate on the graphscreen? You can use the following commands, found at [2nd][DRAW][>][1] through [2nd][DRAW][>][3]:
:Pt-On(x,y
:Pt-Off(x,y
:Pt-Change(x,y
Now to explaining what each one does! Pt-On will turn on the point with coordinates (x,y), regardless of whether the point is actually in the viewable area or not. If it is outside, nothing will change, but you will not get an error. Pt-Off does the same thing, except that it turns the pixel off. Finally, Pt-Change will turn the point on if it is off, and off if it is on.
Makes sense, right? OK, here's a sample program that will get an (x,y) value from the user, what they want to do with the point, and do it.
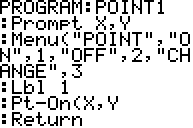
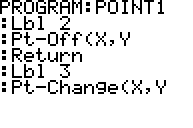
As usual, type it without the line breaks; they are only to show you how it will look on your calculator.
Lists
Variables are good for storing single numbers, but sometimes there is a need to store a large amount of numbers, more than it would make sense to use variables such as A-Z. The solution is to use lists. These can be given custom names up to 5 characters long (starting with a letter) and can be up 1000 numbers long. Lists appear as LNAME and can be found in the [2nd][STAT] menu. If you want to type the name manually, you must first press [2nd][STAT][>][?][ENTER] to get the small L that precedes all list names.
The length of lists, or dimension (dim), is the quantity of numbers in the list. The general way to use lists is as follows:
:Value->LNAME
This will set the dimension of LNAME to value. Next, you can set values to the numbers inside LNAME using this:
:Value->LNAME(x
where x is place in the list, less than or equal to its dimension, where you want to store value. You can also store an entire list of numbers to a list in this way:
:{1,2,3,4,5,6}->LNAME
You can even transfer the contents of a list to another list thus:
:LNAME1->LNAME2
You can recall these numbers in a variety of ways:
:Disp LNAME(x
:Output(b,a,LNAME(x
:LNAME(x)+1->variable
Note that the one command you cannot use this way is Input. Instead of using this:
:Input LNAME(x
you must use this:
:Input X
:X->LNAME(x
You can use any variable; I just used X in this example because it is so commonly employed.
That's about it for this tutorial; the next one will probably be the last. I plan on covering matrices and various other features that I have not yet covered.
Appendix A: Character Tables

Back to the Top
Advertisement